by Gene A. Nelson [Department of Biophysics, State University of New York at Buffalo, 4234 Ridge Lea, Amherst, N. Y. 14226 USA]
THIS ARTICLE describes the construction and use of a binaural recording microphone set. Previously, users had to spend upwards of $1500.00 to purchase a model human head with capacitor microphones. Recently, Sennheiser introduced a lower cost binaural recording set, but it still retails at $330.00. This project utilizes two high quality electret condenser microphones, originally intended for use in portable cassette recorders. It has a price tag of approximately $15.00. While its response above 15 kHz does not match the more expensive units, it will make this fascinating technique available to many more experimenters.
Theory
Before we build the unit, it will be instructive to consider the hearing process. When you close your eyes, you can use your ears and brain to determine where sound sources are with respect to you, and whether or not they are moving.
Now, if you place your finger gently over one ear, you will discover that the source placement becomes considerably more vague.

Fig. 1--Schematic of localization process.
Your ears nave access to frequency, amplitude, and timing information from the sound source. Two ears are necessary for determining the placement of a source, as can be seen in Fig. 1, where it will take a slightly greater time for the sound to arrive at the listener's right ear. The time will be given by (the distance AB _ the speed of sound propagation, 335 meters-per-second). Your brain learns to interpret this time difference as directional information. Similarly, the inverse square of decreasing intensity with distance is learned so that a listener can discriminate between near and far sources.
Also, the frequency spectrum of a source changes with distance. The higher frequency components are not attenuated as quickly as the lower frequencies. These transmission differences are also useful in establishing whether a source is in front of or behind a listener. The pattern of channels, the shape of auricles, and the presence of hair produce changes in frequency spectra which aid in signal interpretation. Doppler shift, from a moving sound source, and complex patterns of interference can also be used to help localize sounds. Additional cues are provided by motion of the head and visual inputs.
The question becomes how to duplicate this process electronically at a reasonable cost. Stereophonic and quadraphonic systems provide good approximations, but producing the information for playback typically involves large quantities of microphones, mixers, and other complexities.
Simplification could be accomplished by intercepting this information just before it entered a listener's ears with microphones, and then playing it back over a pair of stereo headphones, recreating that sound field. That is what a binaural record-playback system is intended to do.
Construction
The two most important design considerations for a binaural microphone are having a lightweight, comfortable support for the microphones that will hold them in the vicinity of the ear opening and having a small, sensitive microphone. Both of these objectives are met in the design presented here. The support is made of Plexiglas, and the condenser microphones are about the size of cigarette filters. The whole unit weighs approximately two ounces, excluding cables.
The first step is preparing the Plexiglas strip. To determine its proper length, take a narrow strip of paper or a fabric tape measure, and measure the distance from your left ear opening to your right ear opening, measured over the top of your head. Add 6-cm. to this length and cut the Plexiglas strip to this length. The edges of the strip should then be smoothed with sandpaper.
Next, the strip is bent to the proper shape to match your head. Since Plexiglas becomes flexible when heated, we will heat and bend it. The easiest way to heat it is to use a gas stove (or an electric stove on High). This step requires some caution, since your hands may be burnt if they are not insulated. Since the Plexiglas is flammable (though less so than wood), you should also have a large pan of water available to immerse the plastic in, in case you accidentally overheat it to ignition. It usually does not continue burning when it is lifted above the flames. Bending takes some patience. First, remove the paper backing and all adhesive. Start by heating up the center 6 cm (easily found by balance) 3-6 cm above a low flame, turning the strip over about once a second. The plastic is pliable when it bends under its own weight. The bend is set by cooling the plastic in the previously prepared cold water. Avoid pulling the ends apart, which distorts the plastic. A bend about 5-7 cm from the center bend on each side yields an approximate "U" shape. A slight bend about 3 cm farther away from the center on each side should complete the bending. After the plastic is thoroughly cooled, it can be size checked for a comfortable, but not a snug fit.
Reheat and re-bend as necessary. If you are more artistically inclined, you may want to form a continuous bend, so that it looks like a headphone headband. You may also want to use a large can or pot as a guide for the proper curvature. The strip should lie flat on a table when completed.
Next, the distance between the points where the microphones are to be mounted is measured along the strip. This distance will be referred to as the inter microphone length.
One of the audio cables is cut to this length, plus the cable length to the recorder. It's important that a thin, flexible cable like RG-174/U be used for convenience and light weight. Don't skimp on the length of cable to your recorder.
Two meters is a reasonable minimum length. Cut the other cable to this length. Solder the connecting plugs appropriate for your recorder to one end of each cable, taking care not to nick the wires or short between the shield and center wire. The center wire should connect to the tip of the connector. A small piece of heat shrinkable tubing should insulate the center wire. Solder the other end of each cable to the appropriate solder pads on each microphone. Use a small, isolated tip soldering iron, since the microphones are damaged by overheating and static charges.
Attach a 0.75-meter piece of No. 24 stranded wire to the (-) lead of the battery clip. Attach one of the 8.2-kOhm resistors to the other end, and also attach sufficient wire to reach the mounting point for the other microphone. Attach the other end of the 8.2-kOhm resistor to the left microphone ungrounded solder pad. Insulate the lead and resistor with heat shrinkable tubing to prevent it from shorting to the case. Solder the other 8.2-kOhm resistor to the length of wire and right microphone in a similar fashion.

Fig. 2--Detail of microphone attachment.
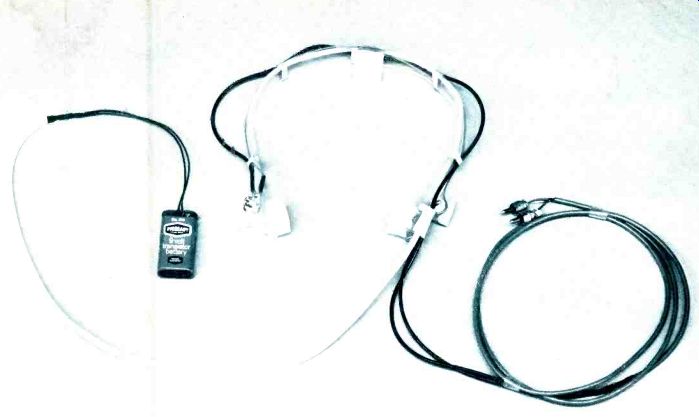
Carefully observing polarity, the anode + of the diode should be connected to the (+) lead of the battery clip, and the opposite side connected to a 0.75-meter length of No. 24 wire, which is also connected to the grounded solder pad of the left microphone. Place electrical tape over the ungrounded solder pad and lead of each microphone. A small piece of aluminum foil is secured over the connector end of each microphone and glued to the metal part of the capsule to serve as an electrostatic shield. The cable and wire passing over the headband are taped to the Plexiglas support. A small piece of acoustically transparent open-celled foam should be secured over the opening of each microphone to act as a windscreen and prevent dust from entering the microphone. The microphones are then glued with contact cement to the support as shown in Fig. 2. All four wires are then taped tightly to the headband at a point below the left microphone to prevent pulls on the wires from damaging the microphones. Three (or more) small pieces of foam are glued to the inside of the headband to make it more comfortable and prevent it from slipping off. Their placement is shown in the photo. Installing the battery completes the assembly.
An intermittent problem may be caused by poor contact with the battery. The Keystone connectors don't hold well without some remedial bending. It would be a good idea to tape the supply lead to the battery to prevent the contact from being disturbed.
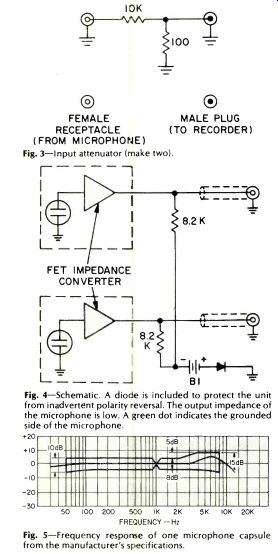
Fig. 3-Input attenuator (make two).
Fig. 4-Schematic. A diode is included to protect the unit from inadvertent polarity reversal. The output impedance of the microphone is low. A green dot indicates the grounded side of the microphone.
Fig. 5-Frequency response of one microphone capsule from the manufacturer's specifications.
Using The Microphone
The microphone is designed for portable use, and with a portable stereo recorder, you can make recordings anywhere. The battery should last 200 hours under constant use.
You should become familiar with the microphone's characteristics before you go into the Everglades to record alligators or what have you. So, with appropriate adapters, hook them up to the tape recorder you use at home, put them on your head, put the battery in your shirt pocket, and record music played through your speakers or sounds around your home. The microphones are rather sensitive, being rated at-58 dB (0 dB = 1V / dyne / cm' at 1 kHz). It may be necessary to use a 20-dB attenuator on some tape recorder inputs.
One can be constructed simply and is shown in Fig. 3. It may be necessary that the good low-frequency response of the microphone will necessitate the use of a 50 Hz low-frequency roll-off filter, which is available commercially.
One very interesting and entertaining application is tape recording parties or conferences. It is much easier to distinguish individual speakers using the binaural system than with a conventional stereo set-up. Sounds such as ringing telephone come through with a disconcerting authenticity.
When you are wearing the microphones, it is impossible to monitor with headphones. In this case, simply buy a Styrofoam head (sold in department stores for storing wigs). Place the microphone on the head, and mount the head on an appropriate stand. If this is unavailable, you can always use your knee when sitting, with some loss of sounds behind you.
It's important to play your recordings back over headphones; otherwise, much of the directional information is lost. Non-isolating headphones like the Sennheiser HD-414 and HD-424 are ideal for this application. Incidentally, the microphones are so unobtrusive that while the author was recording a jam session, the performers were unaware they were being taped, since they didn't see any microphones.
Be sure you have permission to record before you start! Unfortunately, there are not too many portable stereo tape recorders on the market. Here is a tabulation of some of those available.
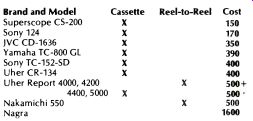
above: Brand and Model; Cassette; Reel-to-Reel; Cost; Superscope CS-200 X 150 Sony 124 X 170 JVC CD-1636 X 350 Yamaha TC-800 GL X 390 Sony TC-152-SD X 400 Uher CR-134 X 400 Uher Report 4000, 4200 X 500+ 4400, 5000 X 500 Nakamichi 550 X 500 Nagra 1600
Other manufacturers include Telefunken, Tandberg, Grundig, Phillips, and Neal ( Great Britain). One advantage of the high output of these microphones is that they can drive an Advent Model 101 Dolby system directly, which can be fed into the line input of your tape machine. Noise seems less obtrusive than in conventional listening arrangements, but the Dolby will definitely improve cassette recordings. The Advent Model 101 can be adapted to portable use quite simply, since it only requires a 12-volt battery. The microphones will start distorting at 124 dB SPL, so in situations where you can hear comfortably, there will be no distortion.
Using this technique is quite fascinating, even when mundane sounds like passing cars are recorded. It makes possible radio dramas where the listener is right "on stage." I'm interested in what you discover and I invite you to write to me at the address above.
List of Materials
2--Panasonic WM-053 omnidirectional electret condenser microphones. Available from: Pace Electronics Products, P.O. Box 161, Ontario Center, N.Y. 14520. Price: $10.00 per pair.
1-Strip Plexiglass, 55 x 1.5 x 0.4 cm (21.5 x 5/8 x 3/16 in.) available at hardware stores and lumber yards.
2--Minature plugs or phone plugs, as appropriate for your equipment.
2--8.2-kOhm, 1/4-W resistors.
1--Diode, silicon or germanium, 1N914 or equivalent.
4.5 meters RG174-U or similar miniature shielded cable.
1--Battery clip, Keystone No. 72, or equivalent.
1--9-Volt battery, Eveready No. 216, or equivalent.
Misc.: No. 24 stranded wire, contact cement, open-cell polyurethane foam and aluminum foil.
--------------
(Audio magazine, 1976)
Also see:
Record Cleaners Revisited/B.V. Pisha
= = = =